The Art of
Stained Glass
Welcome to an exciting artistic journey!

Presented by DoodleBohmba
How to Use the Program
Each section below features a lesson and exercises (“PROMPTS”) to stimulate your creativity and practice your skills. We recommend completing the lessons in order since they build off of each other.
Go at your own pace and don’t worry about being perfect. No judgment here! Just relax, enjoy the process, and express yourself!
Start Here
For each lesson, simply click on the lesson name to expand or collapse the section.

Basics Building
– art principles + design
– online video learning
– written lessons
– “play + practice” art exercises and creative challenges
– doodling/drawing, painting, collage, and photography
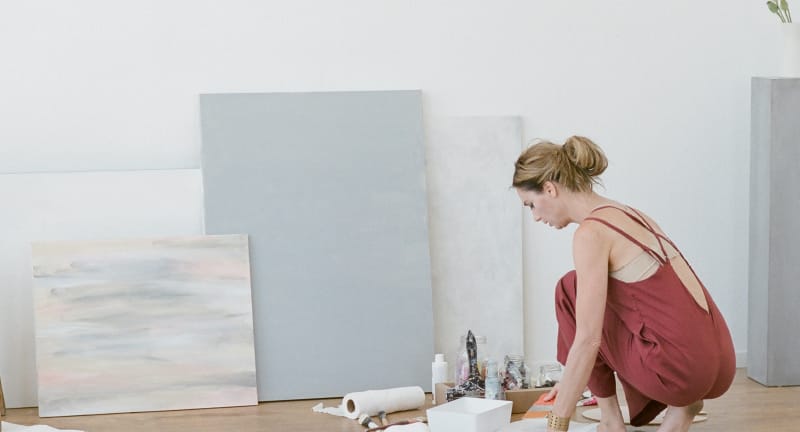
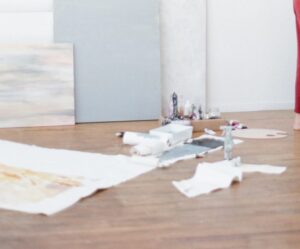
Module 1: Setting Up a Creative Environment
A creative environment is exactly what it sounds like! It’s your individual space that will help spur your creativity. It might take a little trial and error to figure out what works best for you, and it’s ok to change it up based on your mood.
Remember, a creative environment is one where YOU and creating are the focus. Don’t be afraid to prioritize yourself and engage the help of those around you so that you’re not interrupted during your time.
Make a date with yourself and keep it! Whether it’s 15 minutes, a couple hours, or a day off, YOU ARE WORTH IT!
PROMPT: MAKE YOUR CREATIVE ENVIRONMENT
Sound: Sound, or its absence, sets the mood so choose sounds that reflect your creative goals that day. Try low soothing sounds if you’re feeling reflective or an upbeat playlist to infuse energy into your art. Experiment with your favorite tracks, new music, and immersive soundscapes like rainfall and crackling bonfires which you can find free on places like YouTube.
Meditation: Try prepping with activities that sharpen your focus. It might be meditation, a few minutes of yoga, a short walk, or deep breathing exercises.
Scents: Aromas are strongly connected to memories and emotion so using scents can direct your creativity by triggering those emotions. Use candles, incense, plants/flowers, foods, etc.
Touch: Noticing the texture of your materials can enhance your creativity and even be a meditative technique to help you focus. The grain of canvas, thickness of paints, the waves and pits in glass, etc.
Sight: Look around your creative space. Is it organized, cluttered, serene, or chaotic? Is it well lit? Does it have things that inspire you like photos, books, and visually appealing objects? Is your space is inside or outside? Consider how the space makes you feel and set up accordingly!
Module 2: Spontaneous Art
 There is no wrong or right in art. We cannot repeat that enough. No judgment, no perfectionism here! Whatever you’re feeling, whatever you’re creating, it is what it is. Go with the flow!
Focus not on the outcome but instead on the idea or feeling and let it guide you. You might be surprised by where you end up.
PROMPT: SPONTANEOUS ART STARTS WITH SPONTANEOUS THOUGHTS. RESPOND TO THOSE NUDGES.
- Make sketches of ideas throughout the day. Identify how you are feeling at the time.
- Make a list of subjects or ideas that you are interested in or passionate about.
- Prioritize your list and ideas, giving the highest importance to those that you feel most strongly about.
- Begin concept sketches that add focus to or emphasize your story.
PROMPT: GET YOUR HANDS DIRTY
Start with an idea, perhaps an emotion or a message you’d like to convey. Then think of an object to express that idea.
Example: The sun representing optimism and joy.
Draw, paint, etc. that object using whatever color, force, shape, size, and placement comes to you. They all represent how you’re feeling.
Add more to your artwork like objects and background – as more objects appear, a story begins to take shape. If your mind wanders, that’s ok! Let it wander back to your piece and keep going until you feel your piece expresses your idea.
Congratulations on creating your first piece!
Module 3: Doodling + Drawing
“If you want to change your life, you have to change your mind.”
Doodling can help you do this by visualizing the change you want to see in your life. The images that you draw will soon symbolize your thinking and assist your processing of your emotions and thoughts, so that you can find your path. Your doodle soon becomes a map of success with objects drawn, words written, and arrows showing and pointing the way forward.
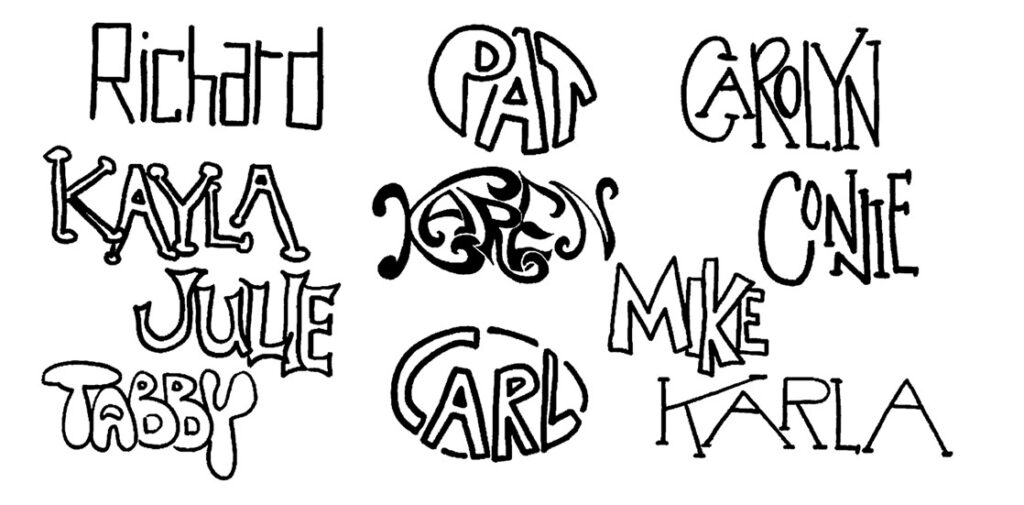
PROMPT: DOODLE YOUR NAME IN A SPECIAL SHAPE
Try doodling your name in a special shape. Doodling your best friend’s name or a family member’s name in a different, yet special way. Think about how the shape and the style of lettering you choose reflect your feelings about the person or your image of their personality.
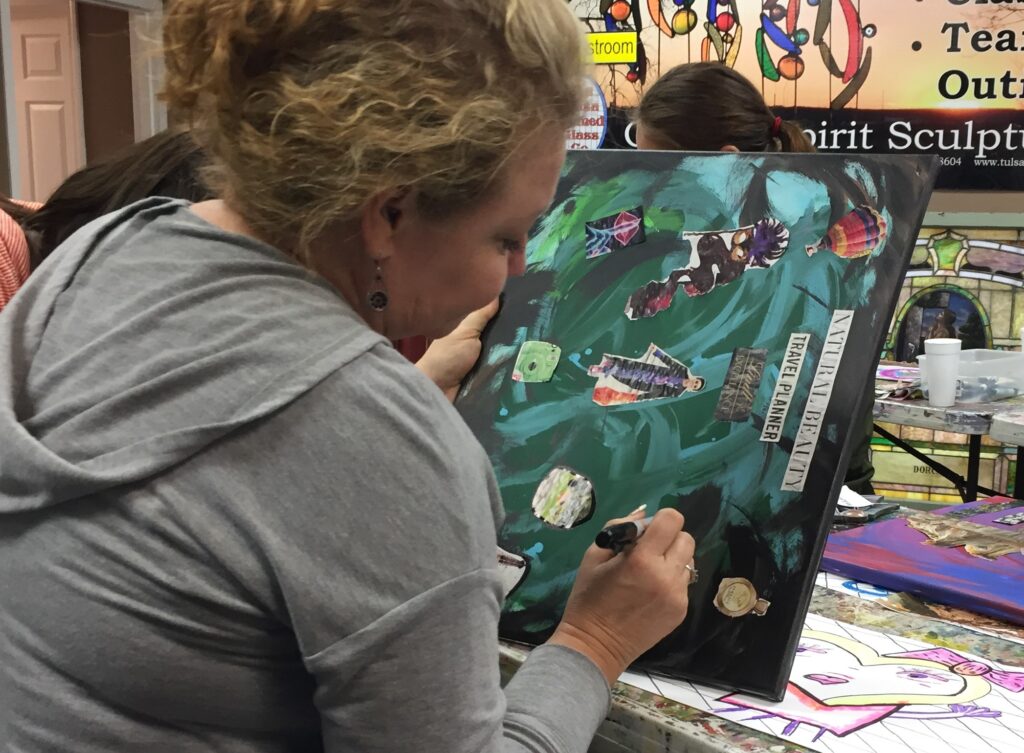
Module 4: Storytelling through Collage + Photos
Storytelling with art is the use of images and symbols as tools to convey meaning. Having a better understanding of the elements and principles of art makes the outcome more understandable. Of course, every artist begins at step one. We all learn the basics first, and then grow in our skill set. So, if you are a beginner as an artist, crafter, or creative person, you don’t need to be afraid or embarrassed. Just get started!
No matter what your story may be, doodling is a great way to put that story into visual form. And you can build on that process by using your doodles to create a vision board to help you visualize your desired future. Combining doodles and collage is an effective communication tool for creating a picture that inspires you.
PROMPT: MAKE A COLLAGE
- Rip meaningful images or words from pages of magazines. Choose whatever captures what you want to say about your vision, as well as anything that speaks to you.
- Juxtapose the images and words on an art board until you are satisfied with how they are arranged, and glue them down.
- Add doodling to the art board as necessary to tell your story.
- Adding colors and lines unifies ideas.
Module 5: Art + Self-Image
The stronger our self-image, the easier it is to share our thoughts and actions, promoting our creative freedom. To build a strong and healthy mind, start developing a broader and deeper belief system by opening your mind, gaining new information, keeping the good, discarding the not so good. The more you seek, the bigger and stronger you become.
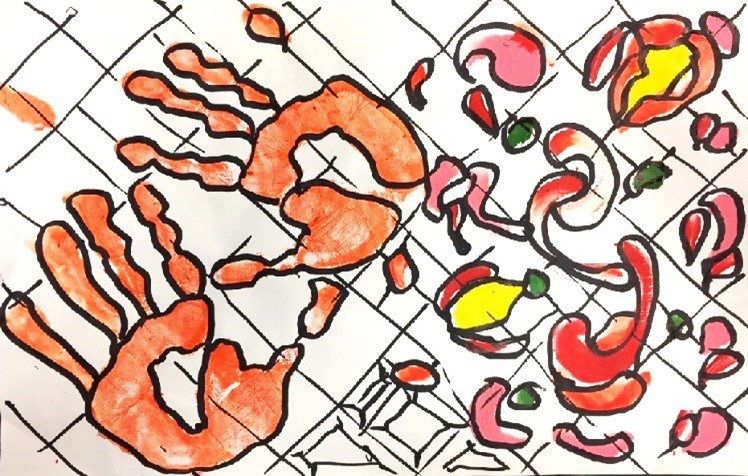
PROMPT: HAND DOODLE
Get a piece of paper and lay your hand on it. Trace around your fingers, and then complete the drawing with symbols representing your self-image.
Building a Better Image
Building a better image starts within our perception of what we think about self-esteem or ourselves. This is built over time from many things such as our environment, where we have been and where we want to go.
Our past is history and cannot be changed. But if we want a better future, we use our present time to take action. A timeline is a great way to view your accomplishments and aspirations to build your self esteem. There is no time like the present to build those dreams and start making them happen.
PROMPT: MARK YOUR TIMELINE
Create a timeline like the one shown. Mark an “X” at your current date, then mark your past accomplishments and aspirations you would like to achieve in the future.

Module 6: Boost Your Creativity
Motion is another method of nurturing your creativity. Meditation works well for many individuals to quiet the mind, while others might do better with dancing & moving with internal feeling. The combination of complete stillness to full action as initiated by the mind is great for the soul.
PROMPT: GET UP + MOVE!
Create your own one-of-a-kind dance routine based on impulse.
- First set the stage having a dimly lighted, clear room large enough to move around.
- With very soft music playing, start seated comfortably on the floor, back straight, and breathing relaxed. Clear your mind of any distracting thoughts and reduce outside noises.
- Rest with the intent of moving when you
feel the impulse to move any part of your body. - Repeat and your mind will soon open to new possibilities. Keep your intent in mind for creative solutions
Module 7: Letting Go of Perfection + Control
Spontaneous art is a method of linking the conscious and unconscious so that a new attitude can come into being. It is a deliberate effort to let your mood speak without seeking to control it and without being overwhelmed by it. Spontaneous painting and drawing come about when we don’t know what we are doing beforehand. Just go with the flow!
If this is not immediately easy for you, don’t be alarmed and don’t give up. As we travel through our creative journey, we are often challenged to get out of our comfort zone. Many of us have to relearn how to play! And we may be faced with uneasy feelings as we go through the creative process. Be gentle with yourself when you feel uncomfortable. There is no judgment in spontaneous art, only responding to your intuition and feelings with colors and shapes.
PROMPT: SWITCH HANDS
 When you draw using the opposite from your writing hand, your focus is placed on making images, leaving your mind free to initialize your intent and dreams. In this exercise, draw a doodle using your non-dominant hand. Using your “opposite” hand also creates new neural pathways in your brain, which keeps your mental processes healthier – a great side benefit of working to enhance your creativity!
Module 8: Taking Artful Risks
Creative people always look for the new, because it feeds their creativity. Attending classes on different artistic techniques or expanding your knowledge in any area can open your world. While it’s always possible to learn on your own, through individual lessons or online, there are distinct benefits from attending in-person classes with fellow students when you can do so. Group sessions can foster more ideas. And it is more exciting and challenging to bounce thoughts back and forth with other people than to only work by yourself. Toss out your inhibitions and old thinking patterns to generate new ideas. Discipline yourself to visualize the potential of the ordinary by discovering its uniqueness.
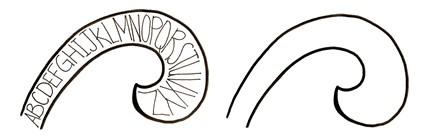
PROMPT: GET OFF THE LINE
Make your letters fit the curve. Try your favorite mantra or make up something new!
Module 9: Building Self-Esteem through Art
Creating can be spontaneous, and its result is a powerful visual language to express inner and outer emotions. By observing and doing, you will become more skilled and develop confidence in your ability and judgment. The road to success is achieved by accepting, without judgment, your own level of accomplishment at each stage of your artistic development.
Remember — you don’t have to be a trained artist to put a design on paper. Many people think they can’t design or draw, and so they block themselves from growing into the possibilities available to them. Start working to become more artistic in all your endeavors, not just drawing or doodling. When you open up yourself to being more creative, you develop the ability to be so. You can learn techniques and the rules of line and design. But what makes it all work is the creative component, that unique element of your vision and personality that infuses your project with life. It connects the components of your project with a finished product. Although there are many theories about color relationships and line design, your imagination must guide them. In other words, the most important aspect of any artwork you do is — YOU.
PROMPT: DESIGN AN AWARD
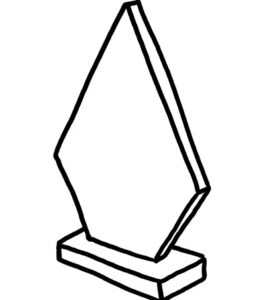 Create an award you deserve – or one you’d like to earn!
Module 10: Channeling Unexpected Inspiration
Ideas submitted to the subconscious mind for evaluation or solution can be released during visualization at an unexpected moment. Some people have creative ideas arise in the shower, others while driving. But really, they can pop up anytime, anywhere, so keep a sketchbook, recorder, or journal handy at all times. Most of us carry a phone with apps that can be used for this!
When you feel suddenly inspired try to work quickly to record the concept without concentrating on specific details. Train yourself to draw ideas and make notes of color and other particulars. Refine the details or enlarge the sketch later if necessary. This spontaneous method of drawing can sometimes be more creatively successful than a painstakingly well-drafted design. Don’t be afraid to make a mistake and don’t aim for perfection. A perfectionist is never satisfied, and sometimes loses the spontaneous surprise and joy of creation. Whatever you capture on paper doesn’t need to be perfect, nor does it need to be complete or final. It simply needs to reflect what you saw, felt, thought, or were inspired by.
PROMPT: BLIND DOODLE
 Grab a Pencil. Close your eyes and begin a blind doodle. Be as elaborate as you want.
- Spend about a minute doodling “blind” then open your eyes and see what you created.
- Take this exercise even further and outline your doodle with a black marker.
- Come back to this doodle later and apply more detail or designs.
Module 11: Using Visualization for Inspiration
Visualization is one way you can train your mind to release creative thoughts. A free association of thoughts, it is a technique used by writers, artists, and actors to stimulate inventive thinking and new concepts. The subconscious is full of ideas and memories. By clearing the conscious mind of mundane, daily thoughts, you can reach and tap into your inner self. Visualization helps the mind project concepts, whether it is a paragraph, painting, or glass art project.
PROMPT: VISUALIZATION EXERCISE
- Close your eyes. Try to completely relax your body by concentrating on every muscle in your body in turn from top to toe. Take several deep breaths.
- As your body relaxes, visualize yourself walking along a beach in Hawaii. It is summer, and the smell of the fresh sea air fills your head. You hear the gentle sound of waves on the sand and the song of seagulls as they fly overhead. The bright sun warms your body like the hug of a good friend or a cozy blanket. You find a comfortable place to lie down. It is at this point, as you are deeply relaxed and imaginative, that your mind is able to capture wandering images, colors, and textures.
- Now, record the ideas that have come to you in this relaxed frame of mind. Use your sketchpad to save these ideas. Take note whether these ideas are reflective of your past, present, or future.

Module 12: Brainstorming + Creative Blocks
Brainstorming is a technique of talking through ideas that is used to stimulate and foster creative problem solving. It also clears the mind so that subconscious thoughts can surface. You can perform brainstorming by yourself, with a partner, or with a group — though it’s important to remember not to judge or critique an idea while your brainstorming session is happening. And it works whether you’re thinking through an art project, crafting, decorating, planning a vacation, considering new job options…or anything else where you need to generate a list of ideas to work with.
PROMPT: BRAINSTORM
- Determine a length of time to brainstorm. You want to give yourself enough time to generate creative ideas, but don’t go so long that you get worn out.
- Sketch or write down every idea that comes. Remember, this is not the time to evaluate ideas for their worth, ease, or any other criteria. No idea is too silly, too outlandish, too difficult, or too impractical. At this stage, you are dreaming and imagining. Don’t censor yourself or others. Make sure the entire group understands and agrees to this rule and remind them of it as needed.
- Connect the ideas together. Once you’ve gathered your ideas, see where they intersect. Find the common threads and link the ideas to give yourself a clearer picture of what your subconscious is telling you.
- Choose the best idea. Finally, once you’ve done everything else, you can begin to evaluate the ideas you have come up with. Choosing the best idea means choosing what works best for you at this time. It may be the idea that you can know you can make happen right now, or the solution that works best to solve your problem, or the opportunity that will stretch you and invite you to grow. The good news is it’s up to you!
PROMPT: CREATIVE UN-BLOCK
When you want to be creative but have a creative block, grab your pens & markers and ask a friend to join you. Each of you will take turns doodling. First your friend, then you. If it helps, set a timer for each turn.
Module 13: Creating with Purpose
Our thoughts are an essential element in the creation of artwork. So, an initial place to begin is to set an intention — a vision of where we are going and what things will look like when we arrive, or a clear idea, word, or feeling that we want to express through our artwork. The more attention or focus we give to our intention, the more we believe, and the more we do. This is true for anything we set out to do, and especially when we are embarking on creative endeavors.
The process that a beginning artist goes through is similar to writing. And it can be helpful to start your artwork by journaling or writing down your thoughts.
PROMPT: FREE-FLOW WRITING
Sit in front of a blank sheet of paper with pen in hand and with something on your mind. It may be an idea, an image, an emotion, a situation, or something else. Make sure your surroundings are quiet — turn off the television, and set your phone on silent.
Breathe deeply, and begin writing. Don’t worry about what you write, and don’t overthink the process. Allow your subconscious to bring up words into consciousness, and let those words flow onto the paper. You might think of this writing approach as a stream of conscious- ness. You are simply allowing thoughts and words to come as your mind thinks them. Organization and order, grammar and spelling, all can be applied later.
Module 14: Finding the Emotion in Your Art
There is feeling in everything. Once you realize that feeling, you have options. You are able to understand your emotions and how they have influenced your art. The process of spontaneous painting can be done over and over until you have worked through emotions and are able to hold on to only the ones that produce positivity, light and creativity.
You can take your art and flip the page around, over and upside down. Do not try to “understand” the artwork. Instead, try to quiet your thoughts and understand the emotion behind the piece.
PROMPT: DOODLE STREAM
In this moment right now, other than reading this page, what is on your mind? Whatever that first thing is that you just thought of, draw it. Allow your mind to freely follow your thinking and doodle the next thing that you think of. Continue this doodle stream of thinking and drawing. Try to do so without putting a whole lot of energy into what your thinking and doodling. Continue this process until you’ve filled up the whole page with objects. Take a look at the whole page. Does it reflect your personality?
Module 15: Painting with Different Tools
The goal of this lesson is to have fun and not think. Don’t worry about getting messy! And do not use a paintbrush! Feeling the texture of the paints and paper or canvas is an intimate and tactile experience. This is a great way to tap into your creativity and process emotions. It’s therapeutic! Start by immersing your finger into one of the paint colors and begin applying it to your paper. (The results will be more fun, and more authentic, if you use your fingers and no brush.) Then, move from one color to the next, trying not to mix them.
 The materials you will need:
- Heavy paper — 11” x 17”
- Finger paints — acrylic paints in vivid colors (use gloves if you are allergic to acrylics or other paints)
- Water
- Apron
- Paper towels
We usually start with five or six doodles. You can paint any subject or as many shapes or sizes as you want; we only ask that you leave about half of the paper area unpainted. Don’t worry about cleaning up between colors, as you may want to reuse a color. Just switch fingers until you run out of fingers or have as many colors as you want. Remember to have fun!
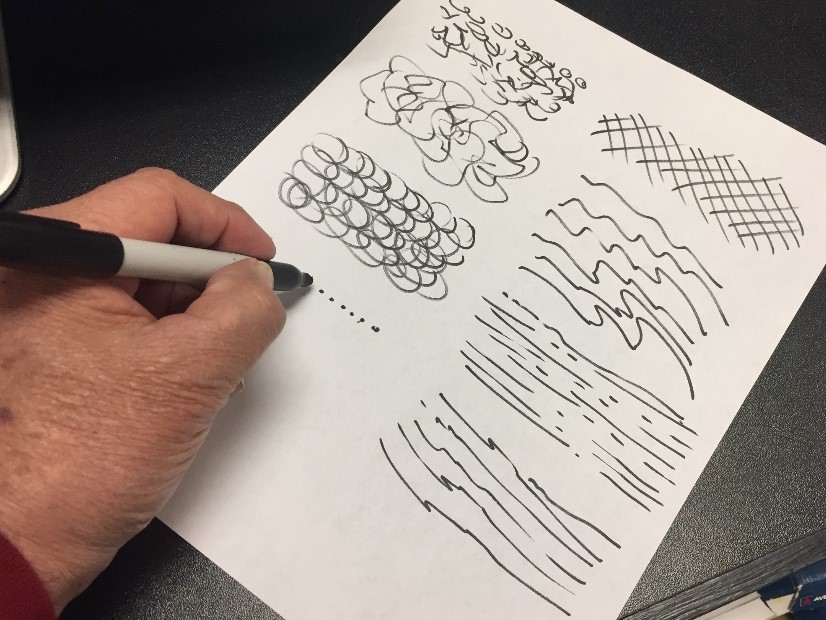
Module 16: Creating Visual Textures
Texture is a surface quality that can be seen and felt, and it can manifest in many different ways — rough, smooth, soft, hard, gritty, sticky. When paired with other design elements, texture can convey a variety of visual messages and often invoke emotional responses. Texture is also a reflection of light and shadow in varying proportions that brings variety to art. In a drawing or painting, you can create the appearance of texture using lines or dots.
In a stained glass window, texture comes from the glass itself, and can change the way light is transmitted and viewed. In a painting, you can add marks that simulate different textures. These can be simple or fanciful, and can get as detailed as you wish.
PROMPT: WORK BACKWARDS
Using sponges, stamps, and your hand apply different pressures – heavy & soft; play with distribution of marks around the paper. Let the texture of the sponge or stamp create the texture for your “glass” design.
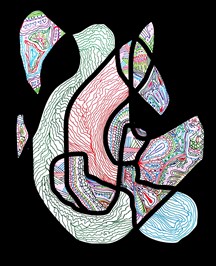
Module 17: Transforming Doodles
With this process, you will be producing a sketch concept that can be turned into a stained glass window, quilt design, or many other craft items. For the purpose of explanation, we will be using stained glass as our craft of choice and the angel from our previous doodle session.
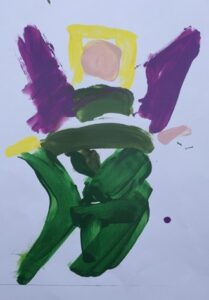 Now, on to the fun part! Let’s go back through some of your work from your finger painting sessions and pick one on them. It can be more intuitive, or it can be one of your replications of a design. Even if there is no discernible subject or shape, you will be creating definition in the next step.
Draw a black line around each section of your image with a marker. This black line represents the “came” which surrounds each of the colored pieces of glass in a stained glass window.
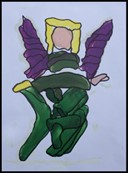 There is no right or wrong to the path you take in creating your black lines. You can delineate colored sections or different finger strokes in more abstract paintings, or you might begin sectioning off areas of more concrete designs (such as the petals and leaves of a flower). The point to remember is that with a stained glass, simplicity is key.
After you have drawn a line around the edge of each element of your image, draw a black line around the perimeter of the canvas to frame the design.
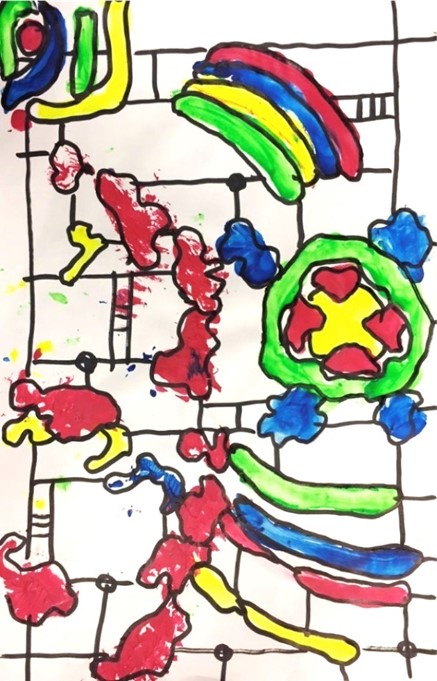
In the representation of a stained glass design, there will be a series of black lines acting as support for the glass, in addition to the lines surrounding the primary design elements. These lines are called a grid and are a necessary part of an authentic stained glass window. Each line must continue along its path until it butts into another line.
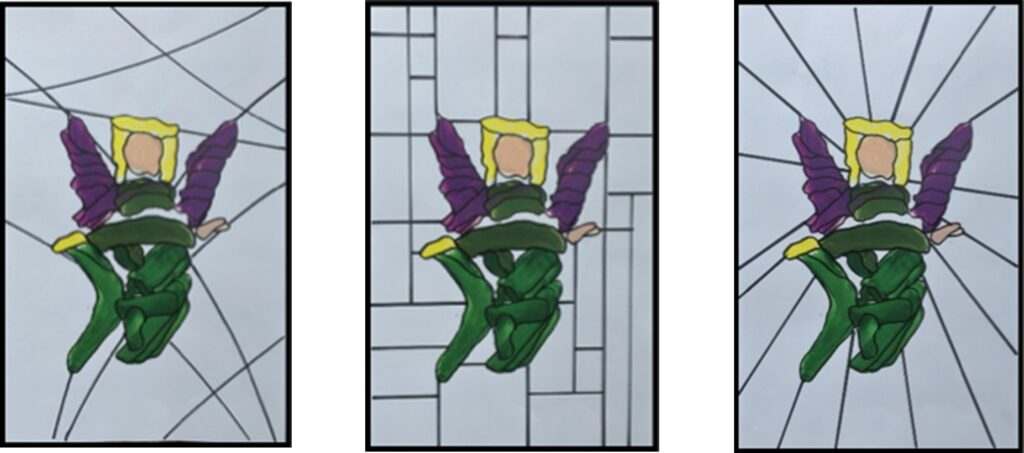
Simplified Examples of Styles using a central object of focus.
Geometric grids can include the horizontal-vertical pattern, which adds interest; a diagonal grid, which enhances the illusions of depth in the panel; or a radial grid, which creates the illusion of forward movement radiating from a focal point in the pane. Historically, you will notice that the majority of stained glass windows and pieces utilized the horizontal-vertical or diagonal pat- terns, giving most pieces with this type of background a more “classic” or “old- fashioned” feel.
Conversely, you can also use a more stylized and contemporary form of grid, where variations of the types and placement of lines create movement across the panel and ultimately determine the style.
Pick your own style to use on your own piece! You can use a pencil at first if you’d like to experiment and then trace over you final design with a black marker.
Module 18: Incorporating Stained Glass Designs
One of the many facets of The Art of Stained Glass program is to take a page of seemingly random, disconnected doodles and turn them into an organized work of art worthy of being replicated into a stained glass window or quilt. The final composition is a surprise when seemingly chaotic images emerge as a harmonious composition. The exercise is intended to be a fun activity to learn spontaneous painting without having the training or skill of an artist.
Some are so convinced they are not artistic or creative; this program of spontaneity is essential to changing their mind. Letting go of preconceived notions of inability is essential. The first step is to stop thinking and start doing in a fun environment.
Materials:
- 5 sheets of 11”x17” white paper
- Two or three sizes of black marker
- Five acrylic paints (8-ounce bottles light in colors)
- Paper towels.
Making Your Doodle
Pour paints onto a paper plate, keeping them separated. Begin by dipping your finger into one of the paints and applying it spontaneously anywhere on the paper. Continue by creating any number of objects in any shapes or colors. Keep them bold and simple. Let them dry.
Define the size: Draw an extra thick black line around the outside perimeter of the paper to define your composition size.
Define the Shape: with the black marker, draw around the perimeter of each shape as close to the color so there is a minimal amount of white showing. There is no right or wrong to the path you take in creating your black lines. You can delineate colored sections or different finger strokes, dividing larger colored shapes as you wish.
Make a total of five paintings that are all different in appearance.
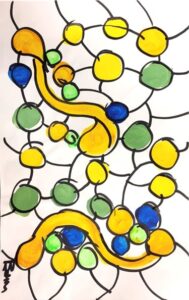
Now you’ll be doing projects using those paintings. Draw straight lines unless otherwise noted. Lines should start and stop at the objects outer edge. Lines should not go through an object.
Doodle Project #1
 For your first creation, start with one of the colored shapes and draw a straight line to another, the closest distance. Don’t worry about the direction of your lines; let them be random. Repeat this step until each shape has at least 4 lines leading from it to other shapes or lines.
Doodle Project #2
On this project, draw horizontal and vertical lines so that each end touches a colored shape or line. Continue the process until each shape has 4 lines projecting out touching another line or shape.
Doodle Project #3
On this project, draw diagonal lines going both directions, such that each section of line ends at a colored shape or line. Continue the process until each shape has 4 lines projecting out.
Doodle Project #4
 On this project, select one object in your composition that is the center of interest. Draw lines projecting out from that object to other shapes then on to the perimeter.
Doodle Project #5
 On this project, draw lines that arch or form a curve from one edge of the paper to the other. The lines should not be parallel to one another. Do what feels fun!
Hang all your pieces on the wall and take a few steps back. Be amazed at your creations! Determine the top of each of your doodle projects and sign your name in the lower right-hand corner.
Things to Think about:
What one is your most favorite and which is the least… why? Is it the color, position, line, line direction or a combination of all?
Module 19: Art Elements - Lines + Shapes
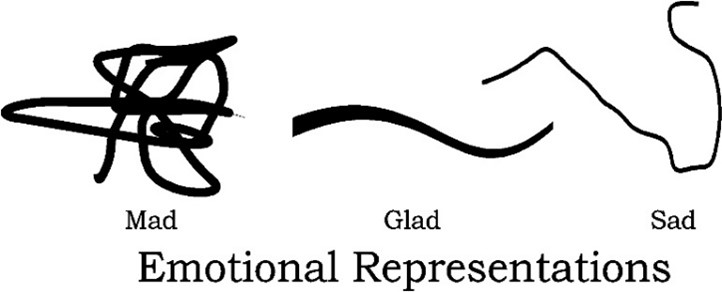
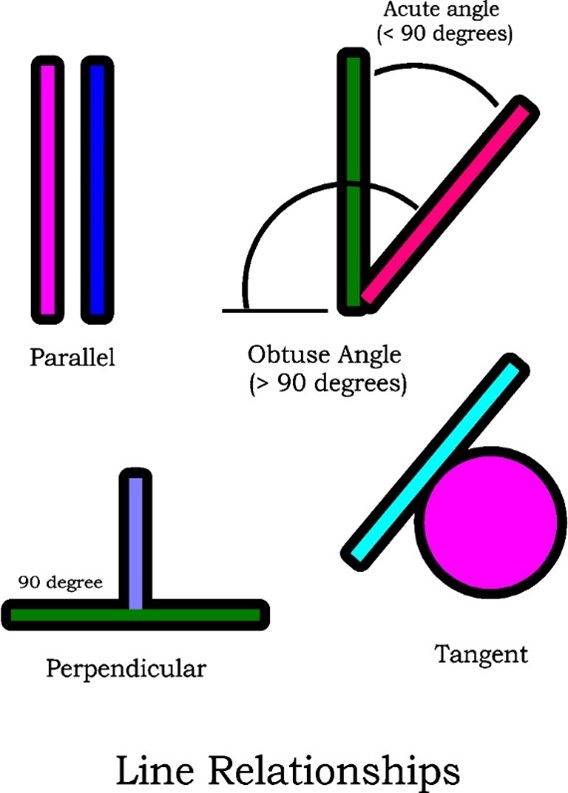
Though it may seem obvious, art contains lines, which are defined as marks with a greater length than width. Lines can be horizontal, vertical or diagonal; straight or curved; thick or thin. Lines can suggest mass, mood, and energy.
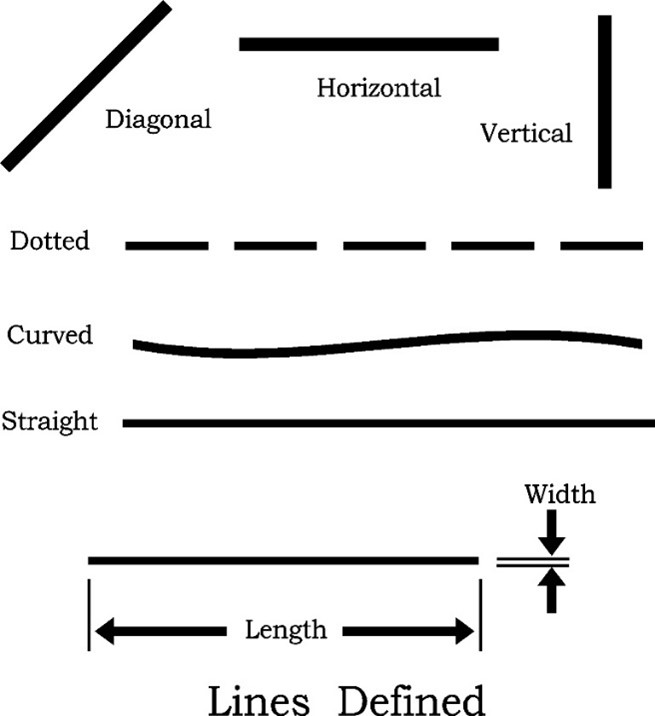
For instance, a curved line is considered soft or gentle. Oblique lines are dramatic. Heavy lines with sharp angles can convey anger. Lines allow the artist to direct the eye of the viewer when looking at the total composition.
Lines are the foundation of a drawing. If a line turns and connects to itself, it becomes a shape. If the shape is filled in, such as with a color, it becomes a solid. When the shape is drawn to be three dimensional, it becomes a form.
When you are drawing a line, the position of your hand, wrist, arm, and torso affect the curvature and smoothness of the line. Stay relaxed. Draw smooth curves by using your arm like a compass.
Experiment with the process of drawing lines, seeing how your drawing changes when you are energetic or tired, peaceful or emotional. As you continue to practice, you will find yourself developing a certain approach, style, or technique that will further your drawing skills.
PROMPT #1
Draw a common object or scene while experimenting with various lines. Discover how something common like a flower, star, or even a circle can be conveyed in a new way by using differing lines.
PROMPT #2
Doodle an image without lifting your pen from the paper. Make a recognizable image from one continuous line. Try different images and see how many you can make.
PROMPT #3
Use glass pieces to make lines of different thickness and shape. An example would be a curved line that starts with larger glass pieces and tapers off using smaller glass pieces, like a comet.
Module 20: Art Elements - Space + Distance
PROGRAM
Art Vocabulary: Space
Nurturing the creative space you work in is important but your art needs space too! Space refers to the area between and around objects. It can be positive (the place the art occupies) or negative (the area surrounding the positive space that helps lend vitality and support to the overall design). It can also refer to the feeling of depth in a piece. Space gives us time to breathe and settle before moving on to the next event or component of our composition.
Showing Depth and Distance
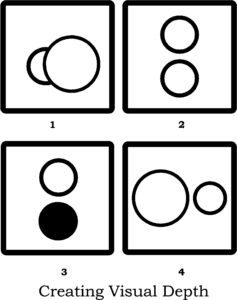
You can use placement, relative size, and shading of objects in a picture to show distance. Look at the illustration below (“Creating Visual Depth”). In the first drawing, the larger circle looks closer than the small circle because it overlaps in front. In the second picture, the top circle appears farther away because it is higher and closer to where the horizon would be. The lighter shade in the third drawing implies that the top circle is closer than the darker one below it. And in the fourth picture, the larger circle feels closer than the smaller one.
Prompt: Far and Near
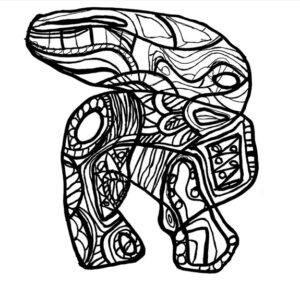
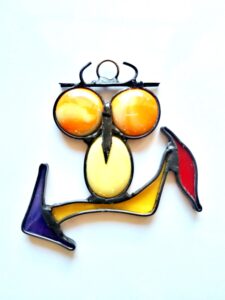
Doodle objects into the foreground and background of this stained glass owl. Create a scene that shows layer and depth by doodling objects that appear to be near and far to the owl subject.
Module 21: Art Elements - Color + Composition
Art Vocabulary: Color
 Color is how our brain perceives the reflection of light from objects. The colors red, yellow, and blue are primary colors. Green, orange, and purple are secondary, as they occur when two primary colors are mixed together. Analogous colors are grouped together on the color wheel (think of yellow, yellow-green, and green).
There are three main characteristics of color—hue, value, and intensity.
Hue refers to the name of the color, such as purple or green.
Value, or shade, refers to the amount of darkness or lightness of the color. A value is achieved by adding black or white to the original hue. Value is critical in producing the illusion of light, form, and texture in art.
Intensity, or saturation, is how bright or dull a color is and refers to the purity of the hue being used.
Generally speaking, hues on the red side of the color spectrum are warm colors and more stimulating, while those on the blue side are cool and more calming. The practice of mixing hot and cool colors in differing ways can result in a harmonious visual effect or can produce an image of discord.
Prompt: Put it Together
Compose a series of numbers on a piece of paper. Try to make each number in a different doodle style. Then, using the Art Elements you learned on the previous pages doodle differing line weights in differing line relationships and textures. Try using different colored pens or pencils to add variety.


 Compose a series of letters on a piece of paper. Try to make each number in a different doodle style. Then, using the Art Elements you learned in previous lessons try doodling differing line weights in differing line relationships and textures. Try using different colored pens or pencils to add variety.
Module 22: Art Elements - Harmony + Variety
Art Vocabulary: Unity/Harmony
Our minds perceive something as being harmonious when there is a logical relationship or progression. In other words, the elements of a work in some manner work together, or complement each other, to form a united whole. Adding something that creates a sense of disunity causes our brain to focus on the “disconnect” and creates an uneasy feeling in response.
Unity is achieved through the use of harmonious elements and can be accomplished through such methods as using similar characteristics in elements or by grouping and aligning elements. Line, color, shape, size, and position should relate to one another in an orderly fashion. All the elements should look as if they belong in the same panel. Common shapes or color should connect different masses.
Prompt: Pulling Together
Experiment using differing line weights, but in a fashion that achieves harmony and unity. Copy from our example or create your own.

Art Vocab: Variety
Variety is varying sizes, shapes, colors, and contrasts can arouse interest.
Prompt: Variety – Spice of Life
Here’s a fun exercise you can do alone or with a friend. A rotating doodle. Set a timer and take turns. When the timer goes off, rotate the paper 90 degrees and start the timer and doodling process again. This exercise will help you loosen up and be more spontaneous. Plus, it’s a great way to look at your doodles from different perspective

Module 23: Art Elements - Balance + Contrast
ART ELEMENTS – BALANCE + CONTRAST
Art Vocab: Balance
Balance refers to the distribution of the objects, colors, texture, and space in a manner that creates the impression of equality in weight or importance. If you imagine that your design is a scale, all of these elements should be balanced to make a design feel stable.
The concept of balance in art can be understood if you think of balancing objects on an ordinary weighing scale. If they weigh the same amount, objects on either side of the scale will cause the scale to balance. If the objects are unequal in weight, the scale can also be made to balance; the lighter weight must be moved farther from the center of the scale than the heavier weight. This idea can be applied to how you place objects on your canvas, creating visual weight.
Balance encompasses texture, color, and pattern as well as line. It can be symmetrical, where the elements used on both sides are similar, creating a mirror effect. It can be asymmetrical, where the sides are different but still look balanced, and can be achieved by varying the elements (size, shape, form, texture, and so on). Or it can be radial, where the elements are arranged around a central point and may be similar.
Unbalanced works will often evoke a sense of unease or disharmony when viewed, while balanced works may give a sense of completeness or well-being. Sometimes, a work is intentionally made unbalanced to evoke such sensations.
The single window on the right is unbalanced until you see it with its companion window.

Prompt: Balance It Out
Create balanced corners. Use our example to see how we doodled our balanced corners. Now you try.

Art Vocab: Contrast
Contrast in art is the arrangement of opposite elements — such as rough vs. smooth texture, dark vs. light value, small vs. large shape — in a work to create visual interest. Variations in elements like color, value, size, and direction function as a means of captivating the viewer’s attention and allowing their eyes to flow naturally over the work.
Greater contrast draws the viewer’s attention. A work with high contrast will make a work “pop” more and appear vibrant, vigorous, or lively. Conversely, a work with low contrast will seem more quiet, calm, subtle, or reflective. Without contrast, a work is monotonous and boring.
Prompt: Make It Pop!
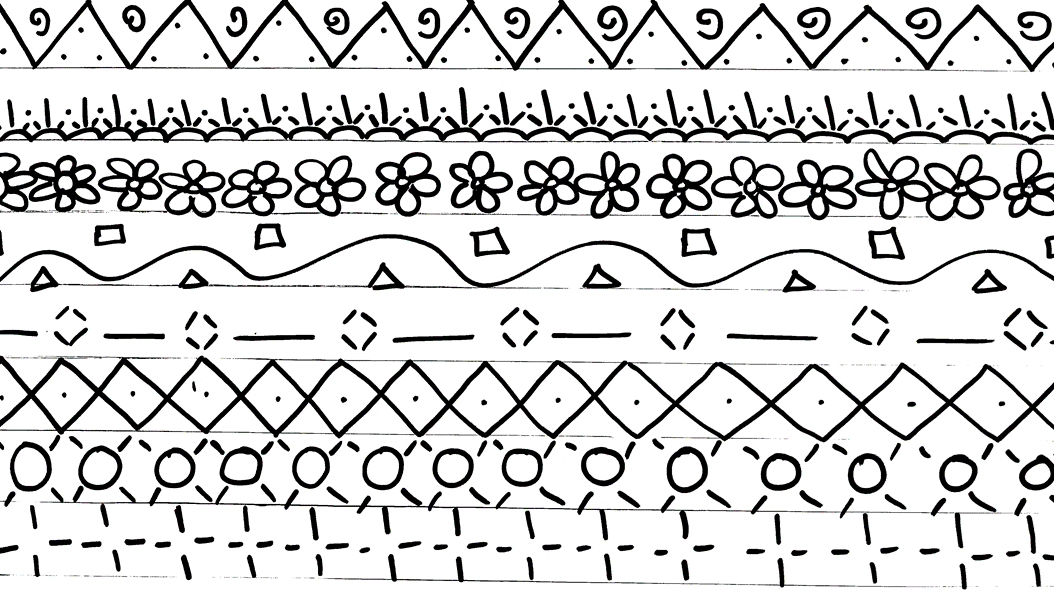
Using our examples, doodle different borders. Try to do one or many. Try to connect different borders to fit onto this page. Add color to parts of each border. Use contrasting colors or analogous colors.
Module 24: Art Elements - Emphasis, Size, Placement
ART ELEMENTS – EMPHASIS, SIZE + PLACEMENT
Art Vocab: Emphasis
Simply put, emphasis is the idea that a work has a center of attention, or focal point. It is the part of the work that most attracts the viewer’s eye. Emphasis can be created through a variety of methods, including:
- Isolation: Setting the subject amidst a plain or simple background, away from groupings of other design elements, forces the user to notice the disparity and focus on the isolated element.
- Leading Lines and Convergence: Lines, arrows, or other such elements can indicate a direction and point the viewer towards something. This effect can also be accomplished when multiple elements converge toward one point, such as a group of people all pointing to the same object.
- Color Contrast: Contrast in value or color can make elements “pop,” drawing the viewer’s attention to them.
- Size: The larger an element is, the more visual weight it will hold.
- Placement: Elements placed front and center will grab focus. Additionally, items at the top of the frame will focus a viewer’s attention more than elements at the bottom of a frame.
- Framing: Just as a picture frame sets off a painting or photograph, similar elements in a work of art can help direct attention. Doorways, windows, and subject-associated objects (such as an artist surrounded by paint and paintings) can easily serve this purpose.
- Depth of Field: When we view things in the real world, things that are close up are bright and full of detail, whereas things that are far away are often blurry or less crisp. This effect can be duplicated in art by providing more details around the element that is a focal point and blurring or providing less detail for less important or distant elements.
- Absence of Focal Points: It is possible to have no real focal points in a work.
Art Vocab: Subject Size
The space taken up by the subject in relation to the field can be used to create more interest. The first picture shows that the dark circle is definitely the focus of the picture. The second shows that the dark circle is probably the focus, but it leads the eye to pay more attention to the field than the first one did. The third and fourth have the dark circle dominating the field almost entirely. This shifts interest between field and subject. The visual weight of each affects the relationship.

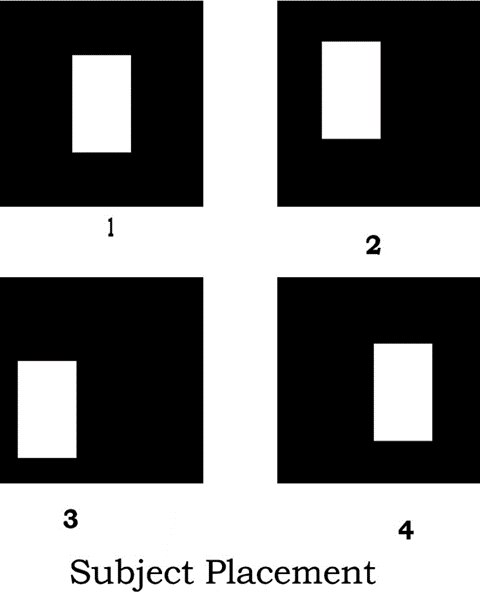
Art Vocab: Placement
The placement of your subject within the field can give different feelings or emotive content to your composition. The position of the subject within the field can make it look like it is floating, falling, moving, or sitting. The position can also evoke feelings of harmony or uneasiness. And the position can make the subject seem more or less important in relationship to the field.
Look at the examples of placement, and see which “feels” right to you.
Module 25: Art Elements - Movement + Repetition
ART ELEMENTS – MOVEMENT + REPETITION
Art Vocab: Movement
Movement is the path the viewer’s eye takes through the work of art, often moving from one focal area to the next. Lines, edges, shape, and color direct movement within a work and thus guide the eye to see the design in a specific sequence — top to bottom, diagonally, or around a spiral path.

Art Vocab: Pattern/Repetition/Rhythm
Pattern is the repeating of an object or symbol all over the work of art. Repetition provides the function of making a work of art seem active, thus creating unity within the work. When you use one or more elements of design in patterns, it creates a feeling of organized movement, or rhythm, like you find in music or dancing. The distance between design elements determines this rhythm, with closely repeated elements creating a faster pace or sense of excitement, and more loosely grouped repeating elements producing a slower rhythm or relaxed mood. Variety is critical to maintain an active, captivating rhythm.

Rhythmic recurrences in a composition hold the viewer’s attention while the eye moves to connect the images. Rhythm occurs when similar elements are repeated at regular and recognizable intervals in alternating or sequenced patterns. In painting, rhythm shows the speed of an idea as it moves across o
Module 26: Art Elements - Proportion + Symmetry
ART ELEMENTS – PROPORTION + SYMMETRY
Art Vocab: Proportion
Proportion refers to how the elements in a design relate to each other in terms of their size and scale. Each element is taken in relationship with other parts of the artwork, and are scaled appropriately, especially when resizing an image.

Prompt: Build It Up
You can take your simple doodles and make them more decorative by adding outlines. Outlines give your doodles a finished artistic look and help fill up white space. Place your simple doodle anywhere on the page. Then build the outline of your doodle with varying shapes, line weights, line relationships, patterns, rhythms, repetition and symmetry. Continue outlining your doodle until you feel it’s finished.


Art Vocab: Symmetry
Symmetry refers to a design in which the elements of the composition are distributed evenly around the center or axis of the composition as a whole. Both sides of a piece, for example, will mirror each other or come close to mirroring each other if the piece is symmetrical. A butterfly is a good example of a symmetrical design — with the wings appearing the same in structure, color, and size on both sides of the butterfly’s body.
In design, symmetry creates a sense of balance and order.
Asymmetry refers to a design composition in which there is no obvious symmetry. The elements of the composition are not equally or evenly distributed around an axis or center point. The resulting feeling may be more organic, freeform, even chaotic if art elements are not visually balanced.
Visual Balance
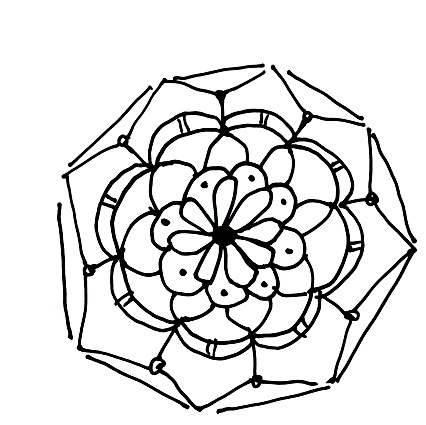
Visual balance refers to the sense in a composition of visual equilibrium. It ties into our innate sense of physical balance, creating a sense of stability as we view the image. Visual balance can be created in both symmetrical and asymmetrical designs, as well as in a radial fashion, as seen in the image below.

Program
Part 1
Stained Glass Projects
– step-by-step stained glass video instruction
– create stained glass mosaics
– make a leaded stained glass project
– our custom kit includes tools and materials (to keep the price low, some supplies like glass sheets you will buy separately)
Module 1: Make a Glass Mosaic
PROGRAM
Module 2: Introduction to Stained Glass
PROGRAM
Module 3: Stained Glass Tools for Beginners
PROGRAM
Module 4: Pattern-Making
PROGRAM
Module 5: Selecting Glass
PROGRAM
Module 6: Understanding + Cutting Glass
PROGRAM
Module 7: Assembly - OPEN FOR SAMPLE
MODULE INFO
Module 8: Soldering
PROGRAM
Module 9: Cement + Cleaning
PROGRAM
Module 10: The Copper Foil Method
PROGRAM
Program
Part 2

contact us

DoodleBohmba

By accessing this site, you agree to the Terms and Conditions. Click here to read the Terms and Conditions.